This integration is powered by Singer's NetSuite Suite Analytics tap and certified by Stitch.
For support, contact Support.
NetSuite Suite Analytics integration summary
Stitch’s NetSuite Suite Analytics integration replicates data using the SuiteAnalytics Connect JDBC driver. Using this integration requires that the SuiteAnalytics feature be enabled in your NetSuite account.
Refer to the Schema section for a list of objects available for replication.
NetSuite Suite Analytics feature snapshot
A high-level look at Stitch's NetSuite Suite Analytics (v2) integration, including release status, useful links, and the features supported in Stitch.
| STITCH | |||
| Release status |
Released on July 20, 2026 |
Supported by | |
| Stitch plan |
Standard |
API availability |
Available |
| Singer GitHub repository | |||
| REPLICATION SETTINGS | |||
| Anchor Scheduling |
Supported |
Advanced Scheduling |
Supported |
| Table-level reset |
Supported |
Configurable Replication Methods |
Supported |
| DATA SELECTION | |||
| Table selection |
Supported |
Column selection |
Supported |
| Select all |
Supported |
||
| TRANSPARENCY | |||
| Extraction Logs |
Supported |
Loading Reports |
Supported |
Connecting NetSuite Suite Analytics
NetSuite Suite Analytics setup requirements
To set up NetSuite Suite Analytics in Stitch, you need:
-
Administrator permissions in NetSuite.. This is required to complete the setup steps in NetSuite.
-
Access to the SuiteAnalytics feature in NetSuite. Suite Analytics is a premium NetSuite feature. Contact your NetSuite administrator if you have questions about this feature.
Step 1: Create a Stitch NetSuite role and configure permissions
To connect NetSuite Suite Analytics to Stitch, we recommend that you create a Stitch-specific role and user for us.
- Using the global search, type
page: new roleand click the Page: New Role result. - In the General section, enter a name for the role in the Name field. For example:
Stitch SuiteAnalytics - Scroll down to the Permissions tab and click the Setup subtab, if it isn’t already open.
-
Using the Permission dropdown, search for
SuiteAnalytics Connect:
- Click Add to add the permission to the role.
- When finished, click Save to create the role.
Step 2: Get the role's internal ID
- Using the global search, type
page: manage rolesand click the Page: Manage Roles result. - Locate the role you created in the previous step.
-
Locate the role’s Internal ID:

Note: If you don’t see the Internal ID column, click the Edit View button to add it.
Keep this info handy - you’ll need it to complete the setup in Stitch.
Step 3: Create a Stitch NetSuite user and assign the role
Next, you’ll create a dedicated NetSuite Suite Analytics user for Stitch and assign the Stitch role to it.
- Using the global search, type
page: new employeeand click the Page: New Employees result. - In the Employee page, fill in the Name, Email, and any other required fields.
- Click the Access tab, located in the bottom half of the page.
- In the Access tab:
- Check the Give Access box.
- Check the Manually assign or change password box to create a password for the Stitch user.
- Enter a password in the Password field, then again in the Confirm Password field.
- In the Roles section, search the dropdown menu to locate the Stitch role you created in Step 1.
- Click Add once you’ve located the role.
- When finished, click Save to create the user.
Step 4: Retrieve SuiteAnalytics Connect details
In this step, you’ll retrieve the details required to connect to NetSuite Suite Analytics from NetSuite.
-
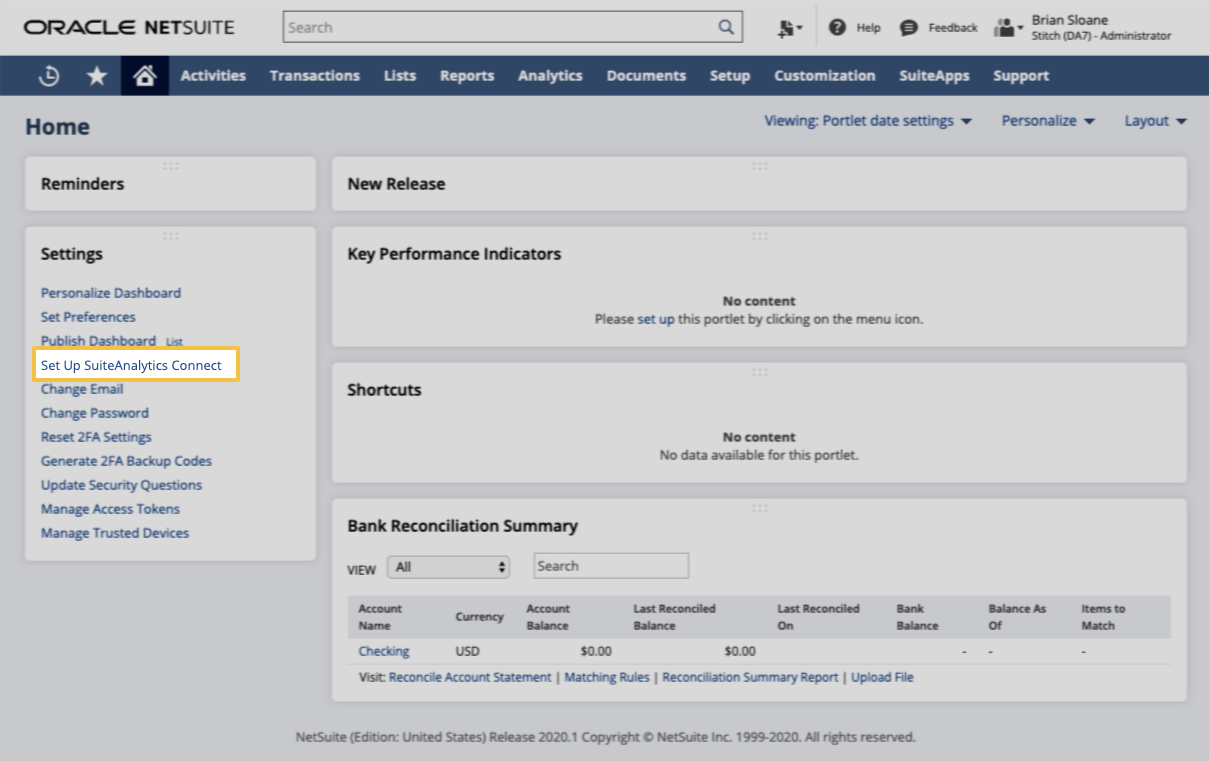
On the home page of your NetSuite account, click Settings > Set Up SuiteAnalytics Connect:
-
The next page will display the connection details in the Your Configuration section:
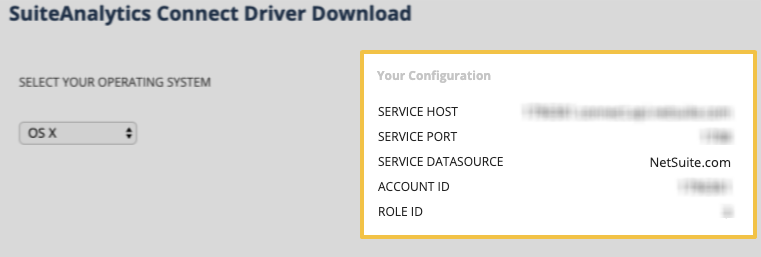
Keep this page open - you’ll need it in the next step.
Step 5: Add NetSuite Suite Analytics as a Stitch data source
- Sign into your Stitch account.
-
On the Stitch Dashboard page, click the Add Integration button.
-
Click the NetSuite Suite Analytics icon.
-
Enter a name for the integration. This is the name that will display on the Stitch Dashboard for the integration; it’ll also be used to create the schema in your destination.
For example, the name “Stitch NetSuite Suite Analytics” would create a schema called
stitch_netsuite_suite_analyticsin the destination. Note: Schema names cannot be changed after you save the integration. - In the Host field, paste the host value from Step 4.
- In the Port field, paste the port value from Step 4.
- In the Account ID field, paste the account ID field from Step 4.
- In the Role ID field, enter the role’s internal ID from Step 2.
- In the Username and Password fields, enter the Stitch user’s username and password from Step 1.
Step 6: Define the historical replication start date
The Sync Historical Data setting defines the starting date for your NetSuite Suite Analytics integration. This means that data equal to or newer than this date will be replicated to your data warehouse.
Change this setting if you want to replicate data beyond NetSuite Suite Analytics’s default setting of 1 year. For a detailed look at historical replication jobs, check out the Syncing Historical SaaS Data guide.
Step 7: Create a replication schedule
In the Replication Frequency section, you’ll create the integration’s replication schedule. An integration’s replication schedule determines how often Stitch runs a replication job, and the time that job begins.
NetSuite Suite Analytics integrations support the following replication scheduling methods:
-
Advanced Scheduling using Cron (Advanced or Premium plans only)
To keep your row usage low, consider setting the integration to replicate less frequently. See the Understanding and Reducing Your Row Usage guide for tips on reducing your usage.
Step 8: Set objects to replicate
The last step is to select the tables and columns you want to replicate. Learn about the available tables for this integration.
Note: If a replication job is currently in progress, new selections won’t be used until the next job starts.
For NetSuite Suite Analytics integrations, you can select:
-
Individual tables and columns
-
All tables and columns
Click the tabs to view instructions for each selection method.
- In the integration’s Tables to Replicate tab, locate a table you want to replicate.
-
To track a table, click the checkbox next to the table’s name. A blue checkmark means the table is set to replicate.
-
To track a column, click the checkbox next to the column’s name. A blue checkmark means the column is set to replicate.
-
Optional: To define a table’s Replication Method, click Table Settings on the right side of the page.
Whenever possible, Stitch will default to using Key-based Incremental Replication. In some cases, you may be prompted to select a Replication Key for the table.
To change the table’s Replication Method:
- Select the Replication Method you want the table to use. Note: Some tables can only be replicated using Full Table Replication. Key-based Incremental Replication will be greyed out when this is applicable.
- If required, select a Replication Key for the table.
- Click Update Settings.
- Repeat this process for all the tables and columns you want to replicate.
- When finished, click the Finalize Your Selections button at the bottom of the screen to save your selections.
- Click into the integration from the Stitch Dashboard page.
-
Click the Tables to Replicate tab.
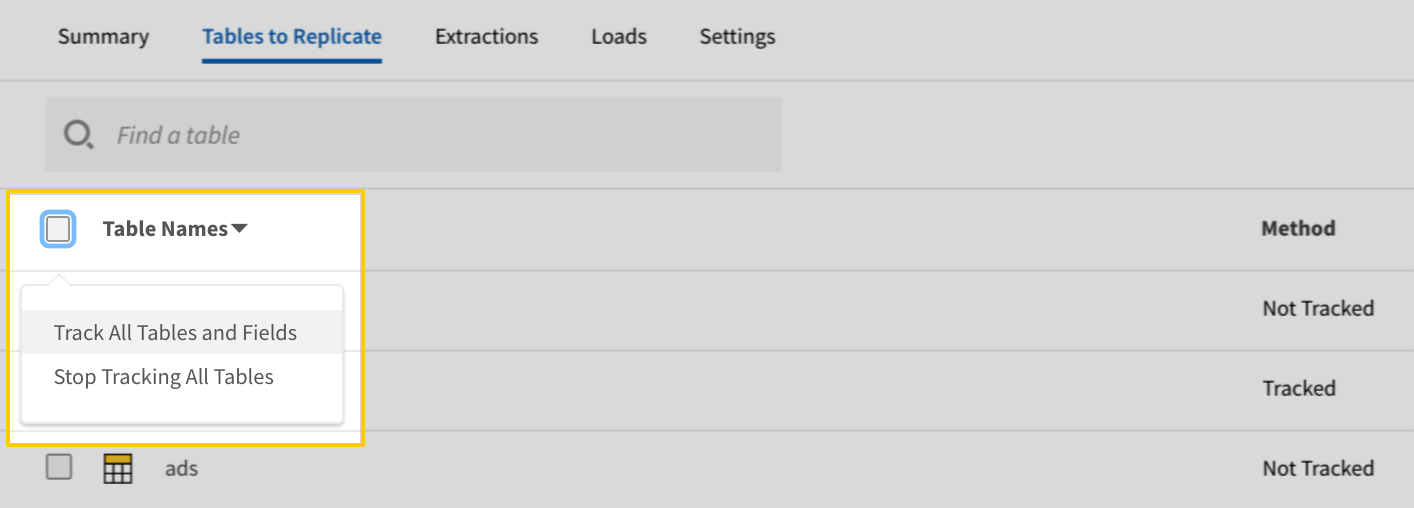
- In the list of tables, click the box next to the Table Names column.
-
In the menu that displays, click Track all Tables and Fields:
- Click the Finalize Your Selections button at the bottom of the page to save your data selections.
Initial and historical replication jobs
After you finish setting up NetSuite Suite Analytics, its Sync Status may show as Pending on either the Stitch Dashboard or in the Integration Details page.
For a new integration, a Pending status indicates that Stitch is in the process of scheduling the initial replication job for the integration. This may take some time to complete.
Initial replication jobs with Anchor Scheduling
If using Anchor Scheduling, an initial replication job may not kick off immediately. This depends on the selected Replication Frequency and Anchor Time. Refer to the Anchor Scheduling documentation for more information.
Free historical data loads
The first seven days of replication, beginning when data is first replicated, are free. Rows replicated from the new integration during this time won’t count towards your quota. Stitch offers this as a way of testing new integrations, measuring usage, and ensuring historical data volumes don’t quickly consume your quota.
NetSuite Suite Analytics replication
In this section:
Extraction
For every table set to replicate, Stitch will perform the following during Extraction:
Discovery
During Discovery, Stitch will:
Discover tables
To discover tables and their schemas, Stitch queries the OA_COLUMNS system table in the Connect Schema for the following info:
| Column name | Description |
| table_name | The name of the table. |
| table_qualifer | The name of the table qualifier. Stitch uses this data to filter out system tables. |
| table_owner | The name of the table owner. Stitch uses this data to filter out system tables. |
| column_name | The name of a column in the table. |
| type_name | The data type of the |
| oa_scale | For |
All tables where table_qualifer != SCHEMA and table_owner != SYSTEM will be returned and displayed in Stitch as avaiilable for replication.
Refer to NetSuite’s documentation for more info about the OA_COLUMNS system table.
Identifying Primary Keys
Stitch’s approach to Primary Keys for NetSuite Suite Analytics is a bit different than other integrations. In NetSuite Suite Analytics, we’ve found that some tables might not have Primary Keys at all, or Primary Key columns may sometimes contain NULL values.
To determine if a table has Primary Keys, Stitch queries the OA_FKEYS system table. If the table has Primary Keys, Stitch will:
- Combine all Primary Key column values on a per record basis
- Hash the result and place the hash in a system column named
_sdc_record_hash - Designate
_sdc_record_hashas the table’s Primary Key. Primary Key columns will have a icon next to their name in Stitch.
 - Automatically set
_sdc_record_hashand the table’s Primary Key columns to replicate
Note: The presence of Primary Keys partially determines how data is loaded into your destination.
Refer to NetSuite’s documentation for more info about the OA_FKEYS system table.
Data typing
Next, Stitch will assign data types to columns. To determine data types, Stitch uses the type_name and oa_scale columns returned from the OA_COLUMNS system table during table discovery.
In the following table:
- NetSuite data type: The data type in NetSuite, based on the column’s
type_namevalue. - Stitch data type: The Stitch data type the NetSuite type will be mapped to.
- Description: Details about the data type or mapping.
| NetSuite data type | Stitch data type | Description |
| VARCHAR2 | STRING |
The NetSuite stores |
| NUMBER | INTEGER |
If the column’s |
| NUMBER | NUMBER |
If the column’s |
| TIMESTAMP | STRING (DATE-TIME) |
Stitch will type |
Data replication
After discovery is completed, Stitch will move onto extracting data. The Replication Method Stitch uses is dependent on whether the table contains valid Replication Key columns.
Stitch will default to using Key-based Incremental Replication if a table contains any of the following columns:
last_modified_datedate_last_modifieddate_deleteddate_last_modified_gmt(transaction_linestable only)
If a table contains more than one of the above columns, you’ll be prompted to select a column to use as a Replication Key when you set the table to replicate. Otherwise, Stitch will use the single column as the Replication Key for the table.
If a table doesn’t contain any of the above columns, Stitch will default to using Full Table Replication.
As this integration supports configuring Replication Methods, you can toggle between Replication Methods for tables on the Table Settings page in Stitch.
Loading
How data replicated from an NetSuite Suite Analytics integration is loaded into your destination depends on two factors:
-
If the table has Primary Keys identified during discovery.
-
If your destination supports upserts, or updating existing rows. For destinations that support upserts, Stitch uses Primary Keys to de-dupe data during loading. Primary Keys are used to identify unique rows within a table and ensure that only the most recently updated version of that record appears in your destination.
Note: For Append-Only destinations, data will be loaded in an Append-Only manner regardless of whether a table has Primary Keys.
Loading with Primary Keys
If the destination supports upserts and the table has Primary Keys, Stitch will de-dupe records using _sdc_record_hash as the Primary Key.
This means that existing rows will be overwritten with the most recent version of the row. A record can only have a single unique Primary Key value, ensuring that only one version of the record exists in the destination at a time.
Loading without Primary Keys
If the destination is Append-Only, or if the table doesn’t have Primary Keys, data will be loaded in an Append-Only manner.
This means that existing rows will never be updated with new data. New and updated records will be appended to the end of the table as new rows.
Note: Querying Append-Only tables requires a different strategy than you might normally use. For instructions and a sample query, check out the Querying Append-Only tables guide.
NetSuite Suite Analytics table reference
Schemas and versioning
Schemas and naming conventions can change from version to version, so we recommend verifying your integration’s version before continuing.
The schema and info displayed below is for version 2 of this integration.
This is the latest version of the NetSuite Suite Analytics integration.
Table and column names in your destination
Depending on your destination, table and column names may not appear as they are outlined below.
For example: Object names are lowercased in Redshift (CusTomERs > customers), while case is maintained in PostgreSQL destinations (CusTomERs > CusTomERs). Refer to the Loading Guide for your destination for more info.
| Related | Troubleshooting |
Questions? Feedback?
Did this article help? If you have questions or feedback, feel free to submit a pull request with your suggestions, open an issue on GitHub, or reach out to us.